When we bought our farm, the one area I knew I wanted to change was the kitchen! It was completely covered in beige tile. It had beige tile floors, beige tile countertops, beige tile backsplash, and a beige tile built in table. Our master bedroom also had beige tile floors and a beige tile fireplace mantel! First of all, I am not a person who likes typical colors like beige. Second of all, I am not a tile person at all. For one thing, I drop way too many things to have a tile floor. True story. I am almost always in a hurry due to the fact I taught school and had three super busy children. I was also the person who organized family life for our blended family of five who never all lived in the same city at one time. There have actually been several seasons in which we lived in four different cities miles apart from one another so time was our enemy, or so I thought. I learned to do everything quickly. In fact, it was so ingrained in me that I have had to “unlearn” doing everything quickly over the past several years since I retired from teaching and our children are grown.
So, because I have never liked beige anything and I didn’t prefer tile in the kitchen, I knew that the tile must go. As part of my plan to design a whimsical, antique farmhouse kitchen, my strongest desire was to have a wood floor throughout the entire kitchen. I started looking at wood floors and tried to reckon my budget and the two were not meshing with one another, so I took to my aforementioned virtual best friend, Pinterest. While looking at pictures of wood floors, I came across some posts about creating a wood floor from #2 pine boards. If you are like me and have no idea what a #2 pine board looks like….or a #1 pine board for that matter…..a #2 pine board is, as it insinuates, a less than perfect or second-rate pine board that still has all of the knots and wood grain showing. It was perfect for the whimsical look I was wanting to create in our kitchen. I love to see knot holes and wood grain on boards so this was the perfect solution for my flooring.
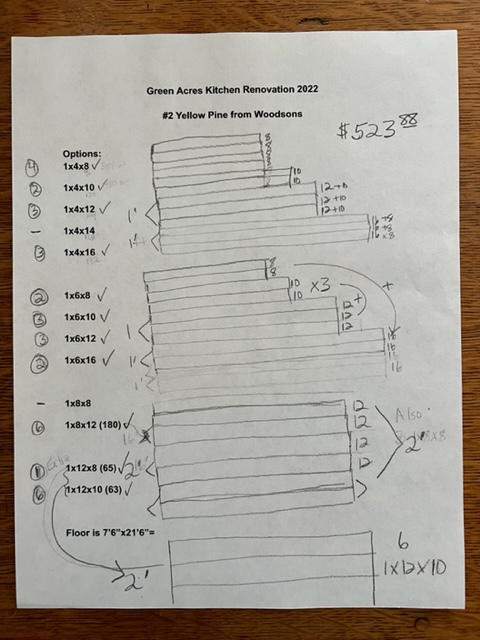
I didn’t quite understand the way the people on Pinterest described their process so I had to work it out myself. I knew I wanted all different widths of pine boards to make it have an authentic, old-fashioned look to it so I sat down with a piece of paper. I figured out how many square feet I would be covering. Then I called the local lumber yard to see how many #2 pine boards they had in different widths before I began working out my order. I used the available widths and lengths they had in stock and drew out a sketch of how many boards of each length and width it would take to cover the square footage of the kitchen addition. Whatever width I used, I had to run that same width the entire 21 foot length of the kitchen. It has to be done like that or the process would be very difficult. After that width was nailed down, I could choose any other random width and run that same width of board the entire length until the floor was finished. It may look complicated in the picture below, but I just worked out one width at a time. For example, in order to figure out how many of each size I needed, I knew it would take three boards that were 4″ wide to cover one foot of the flooring, so I decided to order enough 4″ wide boards to cover two feet of the kitchen floor. On the left of each width is a little bracket indicating how many feet would be covered by that width of board. The kitchen addition was a little less than 8 feet wide and almost 21 feet long so I just needed enough pine boards to cover an 8 foot wide space. So, I ordered two feet wide by 21 feet long of 4″ boards, two feet wide by 21 feet long of 6″ boards, two feet wide by 21 feet long of 8″ boards, and two feet wide by 21 feet long of 12″ boards. The lumber yard was out of 10″ boards or those would have been thrown in the mix as well! The numbers that are circled on the left are the number of boards I ordered of each size. There are dashes next to board widths that they either didn’t have in stock or I decided not to order.
We used liquid nails and a nail gun to attach each board and original the plan was to put antique nails into the boards to make it look authentic, but we just ran out of time and didn’t hammer in the nails!! I am still really happy with how the floor turned out.

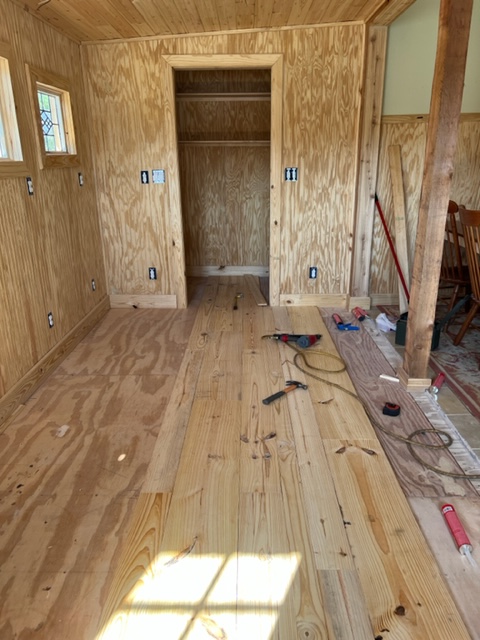


Now, for the staining of the floors. That was interesting. As I mentioned in my previous post about the kitchen sink, I have never stained anything until this renovation. As I also mentioned, I am not a very detail-oriented person so I should probably not be the person staining a new addition, but what’s a girl to do when she is running out of time and money?! Yep, I stained the floor. So, my husband is all about sanding and prepping everything and I am all about jumping right in so there was a compromise. We sanded only the visibly unlevel spots on the floor. Well, my husband has super-human strength so, when he jumped in to sand, he actually carved into the wood which you will hear about later in the post.
The next day, I started staining the floor. I was so, so proud. It looked marvelous. In fact, it was Instagram worthy. Should I go into installing pine floors and staining them for a living? Maybe so. Well, it was going so well and I was sending pictures to my mom, my children, and even some of my closest friends after the first half of the floor was stained. Well, let me tell you something. If you are almost 57, and have never used your scrawny arm muscles much at all in the past twenty years, rubbing on stain evenly with your hands is amazingly rewarding for about an hour. After that, it becomes difficult at best. The end of the second hour and into the third starts feeling like you are climbing Mt. Everest. I could not control my arm by the end and was having to use my other arm to make it work. By the end of the staining experience, I was literally lying on the floor on my side, laughing out loud, and saying “just one more board” over and over in order to complete the job I had so joyously began hours before. I actually prayed for God to give me physical endurance and help me finish staining the floor. It was that hard for me to complete the job! (He helped me, as always, by the way! 😉


Then, right when I got to the place the Outdoorsman had sanded, I decided to speed things up and use a little more stain. Well, you can imagine what that produced. It literally looked like drawings from cave men appeared all over our kitchen floor. I tried to fix it. Tried to rub it all off, but it was too late. The Neanderthal cave drawings were permanently etched into my kitchen floor.
Well, we needed to proceed with our renovation so I just decided to get The Outdoorsman to use his muscle to sand the drawings off the floor and we would have to wait until a future day and time to reapply the stain in that area of the kitchen! Because I knew I would be impatient to fix it, I taped it off and put tools on it so it would look like an archeological dig site and we would leave it alone until after we moved the kitchen sink in and after we had gotten some of the big furniture moved into place. I knew that the plumbers would be there the next day so I couldn’t fix it until I knew no one would be walking on it for a while.


When the floors were finished, I was ecstatic about how they turned out! They cost us a little less than $600 for the lumber, liquid nails, and stain used to create the wood floors. I should have put two coats of stain on the floors, but I couldn’t use my arms for several days after the first coat so I decided one coat was perfect! For anyone who is interested, I used Minwax PolyShades Antique Walnut satin stain because PolyShades has the Polyurethane built in and it saves you a step or two! (I know myself well!) I am thrilled with how our #2 pine board floors turned out!


I love your kitchen! The windows are gorgeous! Your floors are amazing and I love the color you chose! It’s actually real close to the color of the outside of my house!
LikeLike
Thank you, Terry!! I just saw your sweet comment and it made my day!! I really appreciate your kind words about our new kitchen!
LikeLike